THE BEST DUTCH OVENS: GSI 12-INCH HARD ANODIZED DUTCH OVEN

Q: WHAT ARE THE BEST DUTCH OVENS FOR CAMP COOKING?

I want to go beyond normal camp food for my next trip. I’m talking cobbler, cornbread, even pizza. What should I do?

dutch-oven-main_fe

A: The GSI 12-Inch Dutch Oven

The humble Dutch oven isn’t something you would pack for a speed hike of the Pacific Crest Trail, but these heavy, thick-walled pots have long represented the easiest and most pleasurable means of making gourmet food in the outdoors. Dutch ovens distribute heat evenly so you are less likely to burn chili or spaghetti sauce, and they churn out perfect cornbread, cobblers, crisps, stews, and meat every time.

While the original Dutch ovens date back three centuries to the Netherlands, the pots have seen significant upgrades in the past few years. Most cast-iron varieties now arrive from the factory pre-seasoned, making maintenance less of a hassle. Aluminum versions use a manufacturing method to hard-anodize the walls, making seasoning unnecessary. All Dutch ovens are relatively heavy, though, and more appropriate to sites within a mile from the trailhead (and even then, we recommend slipping them into the pack of the least-popular member of your group).

GSI 12-Inch Hard Anodized Dutch Oven.

There are benefits to GSI’s non-reactive aluminum Dutch ovens. They never rust, don’t need seasoning, and are relatively lightweight (this version weighs less than a gallon of water). The 12-inch, equivalent to a ive-quart, bears a hard-anodized coating that makes it non-stick out of the box and lets it withstand the hottest campfires. If you’re looking to create a multi-course feast at the campsite, like a main course and a dessert, the 12-inch neatly holds the 10-inch version inside.

WEIGHT: 6.1 pounds
PRICE: $110

Screen Shot 2013-02-06 at 11.09.44 AM

Q: THE BEST DUTCH OVEN ACCESSORIES

A: GSI Dutch Oven Econo Lid Lifter

An essential tool for a hot dutch oven, the lid lifter works well with the GSI model described earlier.

PRICE: $15

Yakima

Yakima’s BedRock and BikerBar have been picked part of SEMA’s Top 25 Products

2012-SEMA-show-02 copyThe Best New Products from the Big Show 

The annual Specialty Equipment Market Association show is a great place to see amazing modified vehicles and learn about trends in the world of aftermarket manufacturers. It also happens to be the perfect venue to find out what new products are coming for trucks and SUVs within the next year. Here are our favorites from the most recent show..

BedRock and BikerBar

Yakima has two great products for those who use their trucks to carry outdoor equipment or mountain bikes. The BedRock is a tower system that creates two levels of storage. With a mount attached, you can carry cargo boxes, skis, bikes, or boats, yet still have room for other gear. The BikerBar carries two bikes and come in two sizes.

Yakima-BedRock-and-BikerBar

Understanding Your New GoPro

By: abekislevitz

So you got a new GoPro HERO3 Black Edition! Luckily for you, GoPro has added about 137 different filming options so you’ll never really be sure if you’re using the right mode for the activity/film job.  Hopefully I can break it down a bit and unshroud the mysteries of the modes.  Keep in mind this is written for the slightly technologically inclined.

A few things need to be explained when talking about the technical aspects of video resolutions, framerates, and video quality.  In digital video there are a lot of different variables that go into what makes up the overall IQ (image quality). 1080P on a GoPro is FAR different than 1080P on an Alexa – and it’s not just the image sensor that makes it different. Processors in cameras are a huge determinant to how video gets from the sensor to the SD card. There are tricks and shortcuts that can be made to ensure the camera pumps out all the different modes we want in the end.

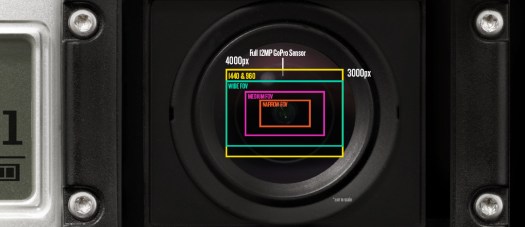
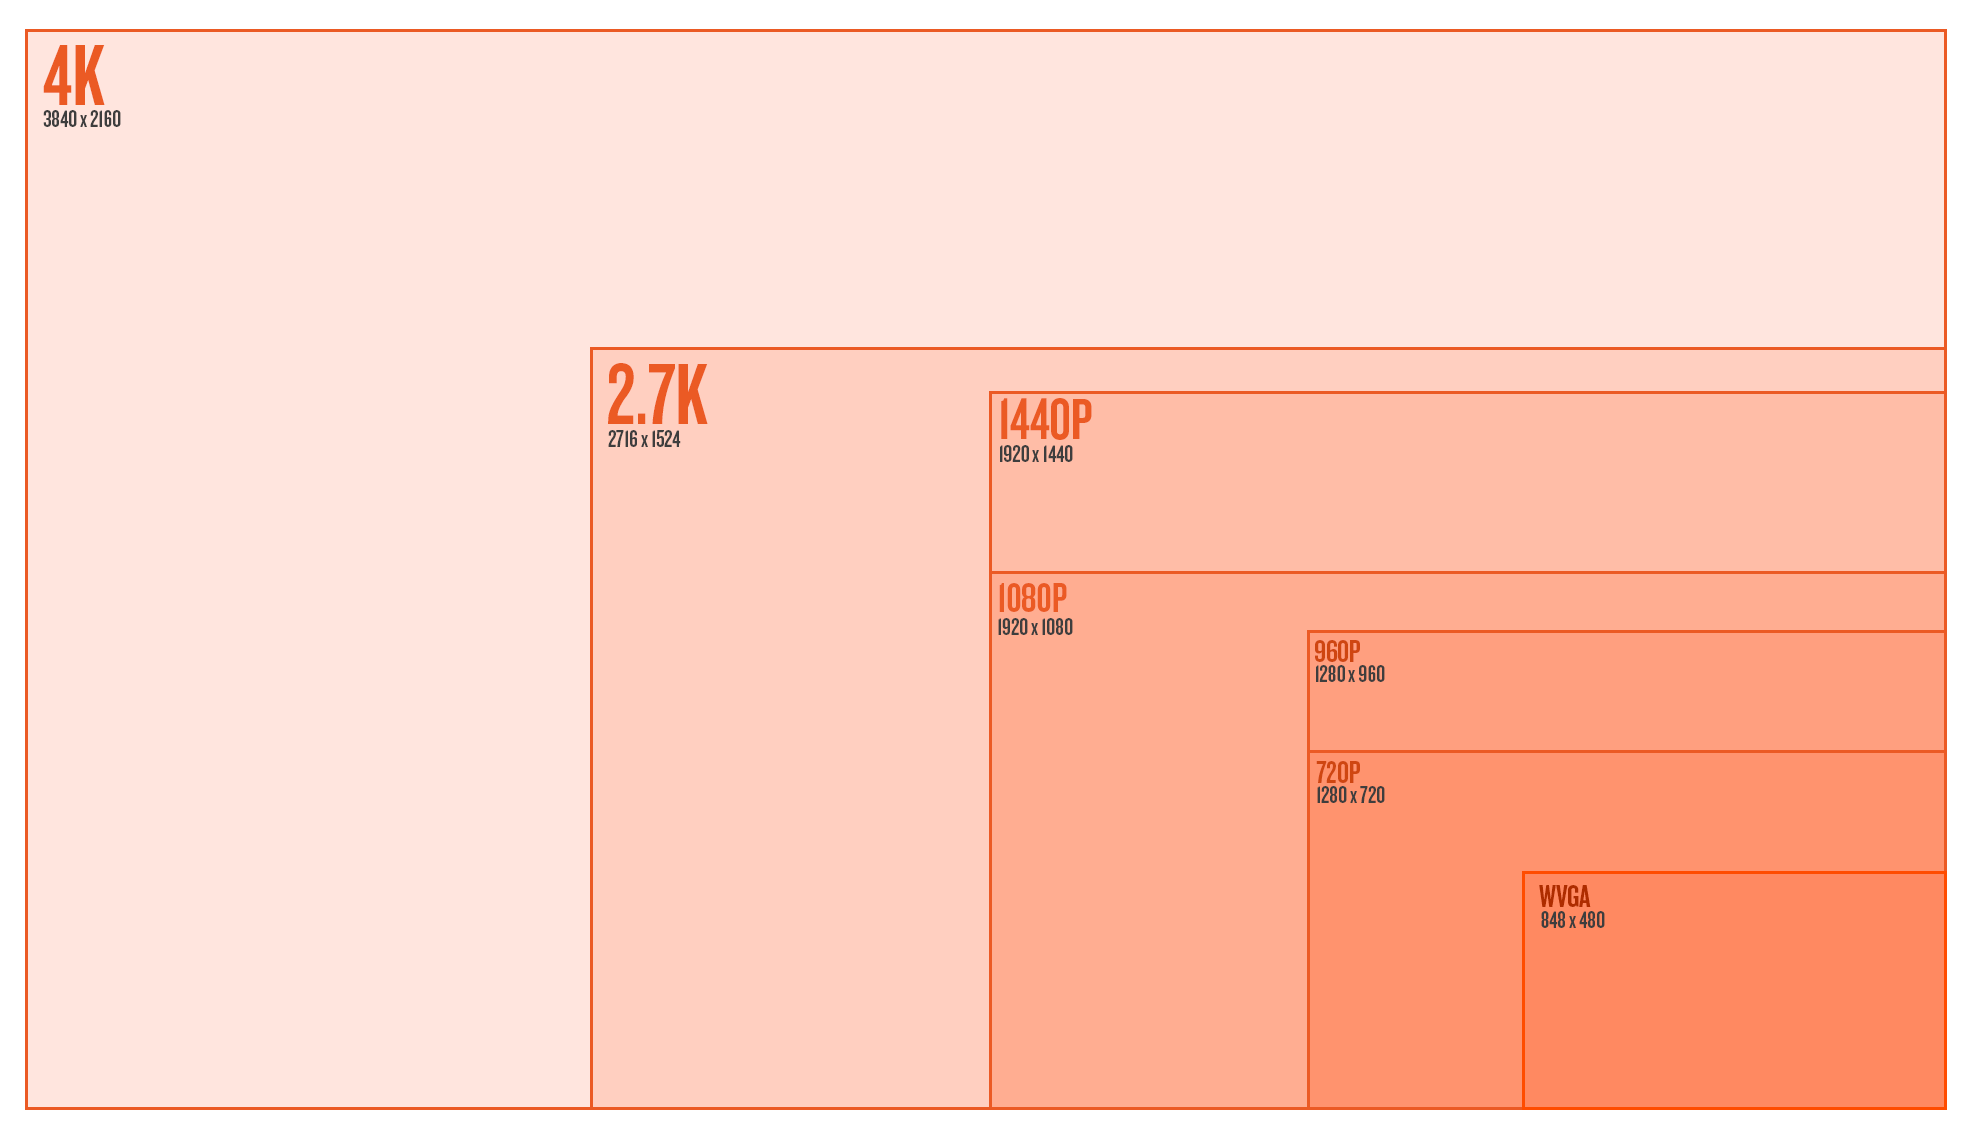
Starting with the sensor, the camera is told to read a certain window of the overall sensor – the bigger the window, the more taxing it is on the processor.  Reading the full sensor means you’re getting the full view coming from the wide angle lens of the GoPro.  The sensor in the HERO3 Black edition is 12MP with a 4:3 aspect ratio.  For 4K in the GoPro it’s reading the full width of the sensor, but not the full height – it’s capturing a 16:9 portion of the middle of the 4:3 full sensor.  Since the final delivery is 4K, it doesn’t have to scale that initial capture at all. This capture window is identical for, say, 1080P Wide; however, it scales it down to 1080P for the final output.  The final output size also has a say in processor taxation – we can get 4K at only 15FPS, while we can do that same capture window but scaled to 1080P at 60FPS.

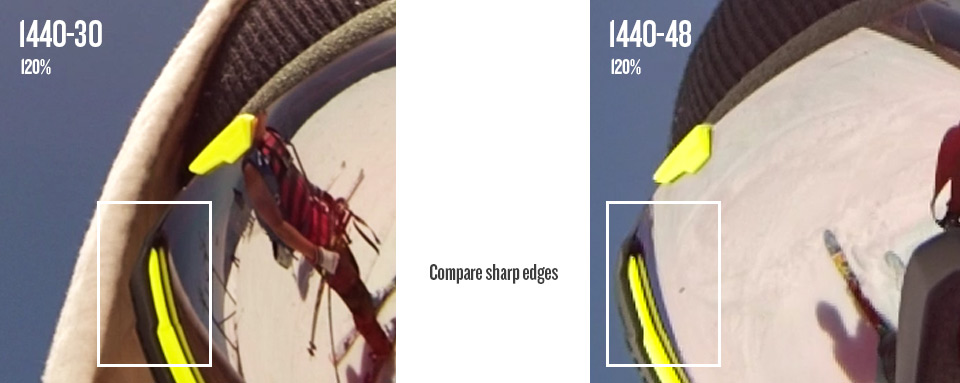
When we talk about digital video sometimes we use the term native to the camera or not.  In the HERO3 Black the camera can capture that full wide 16:9 window, scale it to 1080P and do that natively 60 times a second.  1080-60 and 2.7K are just about the most optimal modes in the camera that really show the true power of the sensor and processor combo.  There are some modes in the camera that are read off of the sensor slightly differently which will end up showing some aliasing (jagged edges).  Take 1440 for example – look at 1440-30 at full resolution and compare it against 48.  The way 48 is read and processed is slightly different than 30FPS to get that large of a resolution combined with a high frame rate. You’ll see the same type of thing in a Canon 7D when looking at 1080P at full resolution compared against 720-60 at full resolution.  Canon’s 720P will have jagged edges because of the way they process the image to get a high frame rate from such a large sensor (high pixel count).

1440compare

Let’s talk about sensor window captures and fields of view (FOV). This is where the Medium & Narrow FOVs come from.  1080P Medium only captures a window in the very middle of the sensor, meaning we don’t see the full wide angle of the camera lens – only that middle slightly distorted part. The raw capture is still larger than 1080P, so it still scales down after the capture.  1080P Narrow is an even smaller capture window at the very very middle of the sensor so the distortion is even less.  By this time, the capture size is nearly equivalent to the pixel size where we are reading nearly 1920 pixels by 1080 pixels (remember the full sensor is 4000 pixels wide by 3000 pixels tall). In this narrow mode it’ll appear fuzzier since the pixels are very small on the sensor and are accompanied by a decent amount of noise.  When we are reading more pixels there are image processes that are done to clean up this noise – and scaling helps a lot. With no scaling, the narrow mode is extremely zoomed in from the original (imagine grabbing the middle 30% of a gopro photo – that’s what your full 1080P video will be). This is very different from digital zoom because the final readout is still native, we’re not digitally increasing the video capture size at all.

HD3_LensCrops

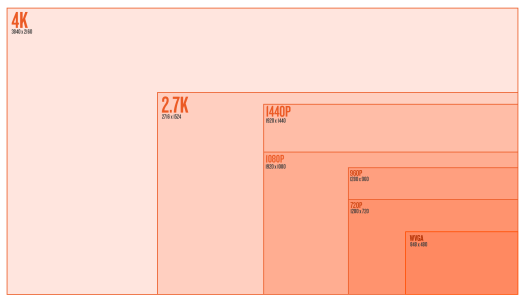
Now that a few of these details have been explained very briefly, let’s take a look at all the modes below:

resolutionsAbe’s Personal Reviews of the Modes

  • WVGA 240 Wide
    Well, it’s WVGA – If you look closely at the image it’s not very clean – aliasing is present.  The novelty of 240 FPS is pretty cool if you don’t care about image quality when stacked up against some of the other modes.  It can look decent by itself when posted on YouTube.
  • 720 60 Wide
    Looks great, but why don’t you try using 1080 60 Wide instead
  • 720 120 Wide
    This mode is tough for me to like.  You’ll notice jagged edges in this mode when looking at full resolution so it won’t even compare to 1080-60 wide – the way it was scaled and read off the sensor gives some aliasing.  It looks great on the web on YouTube – if that’s your final output, go slowmo crazy.
  • 720 120 Narrow
    Bingo. 120 FPS? Check. No lens distortion? Check. Clean image without aliasing? Check! If there’s any mode in the camera that screams “I’m not a GoPro!” it’s this one.  It looks like a 50mm lens and is a clean image.  Slow mo is rad.  This mode is great for web as well.  Blown up next to 1080 or 2.7K, you’ll notice the softness that comes from the Narrow FOV.
  • 960 48 Wide
    I’ve never even tried this mode.  I bet it looks good.
  • 960 100 Wide
    I feel similarly about this mode as I do 720-120 Wide.  With this mode there is the opportunity to gain a bit of resolution by stretching 960 to fit to 1080 and dynamically stretching it.  Either way, this mode will have slight jagged edges when looking at full resolution.
  • 1080 30 Wide
    I did a test where I filmed the same scene at 1080-30 and 2.7K 30. When 2.7K 30 was scaled down to 1080, the details and sharpness were just about identical to 1080-30. So this one gets my full approval; however, you have to ask yourself, why not film this at 2.7K 30 and have the extra resolution if you need it? Either way, 1080 30 Wide is one of the cleanest modes in the camera.
  • 1080 60 Wide
    Comparing 1080 30 & 1080 60, you’ll see 60FPS is ever so slightly softer than 30.  It’s not something you’d ever notice even scaling the image to 720P or viewing on YouTube, but there’s a slight difference in the way it’s processed.  At the end of the day, 1080-60 W is my go-to mode for 90% of filming action sports.  With 60FPS you’ve got reduced rolling shutter as well due to reduced exposure time.
  • 1080 60 Medium
    This mode rocks. It’s very clean, doesn’t look super GoPro-ie, and is in slow mo.  Consider this mode for sweet slider dolly shots, glidecam, or cranes.  Try it for car mounted shots.  Careful with the POV with Medium or Narrow as you’ll get shakier and more disorienting.
  • 1080 60 Narrow
    This mode is very cool.  Still a very clean image; however, at this level you’re going to see more of the pixel noise & artifacting. You’re close to pixel levels without scaling so sensor noise could be an issue at lower light levels.  Also details will be softer overall.  The narrow FOV looks like DSLR video, very unique to GoPro.  Fun fact – we actually pulled out a few 1080-60 Narrow shots from the HERO3 reel because your average joe may see it and assume the video wasn’t fully shot on GoPro.
  • 1440 30 Wide
    I love this mode! First off, it’s VERY sharp and very clean.  It really gives you a sense of real POV when you wear the camera on your head, chest, or bite it in your mouth.  It can be a pain to deal with, as the aspect ratio is 4:3, but if you know the anamorphic 16:9 dynamic stretch tricks, it can be wonderful.  If you’re filming POV to just keep to re-live life later, this is a rad mode to use.
  • 1440 48 Wide
    The high framerate is great, but when looked at full resolution, you’ll see some aliasing.  The way the image was processed to get high framerate produces some jagged edges.  Thankfully, hardly anyone watches this at full resolution so jagged edges are harder to pickup.  This mode still looks great online and scaled down.
  • 2.7K 30 Wide
    This mode is insane.  Here’s what I like about it – sharp as a knife, full sensor wide, full 30 fps, native to the camera.  The one downside is rolling shutter since it is a 30FPS mode.  If you can get it mounted to something steady, at high speeds or low light you’ll notice really nice motion blur with this mode.  The high resolution makes this ideal for cropping and re-framing, or stabilizing in post.  I find this mode has great low-light as well.
  • 2.7K 24 CIN
    I’ve never used this mode.  It’s simply 2.7K 30 Wide with top and bottom chopped off a bit.  You’re not gaining anything by filming in this mode other than the ability to record at 24FPS.  I’ve requested 2.7K Wide in 24 FPS as well so 2.7K CIN isn’t the only option.  We’ll see, but not sure how that missed the initial spec sheet.
  • 4K 15 Wide
    Haven’t used this mode really.  I should try a timelapse soon, but that’s about all I can think of for this mode – timelapse, conform to 30FPS later.  Don’t make a video at 15 FPS unless you’re highly stylizing it and know what you’re doing.
  • 4K 12 CIN
    Hmm.. not sure about this.  Again, just 4K with top and bottom cut off and reduced framerate for the cinema kids.

Protune

This is one of the great mysteries to the general public, but amazing for film professionals.  Most noticeably is its flat color profile. It’s got special curves in the color matrix to pick up shadows more and not blow out highlights.  It also produces very muted colors that can later be color corrected to better match video from other cameras. Next on the list is the lack of sharpness.  You might look at the video footage and think it looks much softer than standard video or that something must be wrong with the lens.  The sharpness you see in the standard modes is actually all digitally added.  For film professionals, the less digitally added stuff in-camera, the better.  It can always be added later and edited to match the sharpness of footage coming from other cameras.  Next is the high bit-rate.  It films up to 45mbit.  Bit-rate levels essentially tell the camera how much data it’s allowed to pass on from the sensor to the SD card – higher bit-rate equals larger video files but is much more high quality.  Low bit-rate will use compression techniques to lower file size by grouping large blocks of colors.  Last on the list of ProTune is the ability to choose color temperatures.

  • Auto
    This is my go-to when using ProTune.  The camera does a great job of reading color and light and correcting for that.  This will give your footage a consistent look and color across the board for seamless footage, especially in snow.  I can provide some insight about what the other color temperatures do but I really haven’t used them much at all.
  • 3000K
    This should be used for very warm light such as early morning sunrises or sunsets.  In a neutral environment (white room indoors) the footage will look pretty blue to offset the warm tones.
  • 5500K
    This should be used for average daylight around noon when it’s harsher and a little cooler light.  In a neutral environment it will look slightly warm.
  • 6500K
    This should be used for colder overcast skies, it’s even warmer in a neutral environment.
  • Cam Raw
    This won’t add any color balancing correction and just spit out what the camera sees in any given condition.  Truly this will give you the most freedom for correction for later, but it could be quite cumbersome as it will always spit out a slightly different hue depending on light and what it sees.

Some important downsides – Protune will NOT look better at night.  Right now the camera has quite a bit of digital gain when it’s dark (think auto ISO pumping) so you see more detail than you’ll normally see with a camera of this size.  This comes at a price, obviously, which is noise in the dark.  This auto gain coupled with the boosted shadows will really look like a lot of noise in pure dark.  You’re better off switching out of ProTune as soon as dusk rolls around.  Also the noise reduction in Protune is lowered almost entirely so you you’ll get more detail in the visuals at the cost of noise.  All this said, this sensor performs extremely well at low-lights for its size.  Eventually GoPro could add a gain control button which would lower all the added auto-noise at low levels.  This would make the camera look crisp and perfect at lower light at the sacrifice of seeing more of the visuals in the dark.

In summary, for me – ProTune + AutoWB + 1080-60, 2.7K, 1440-30 & 1440 48 is my jam.  Experiment with 720-120 Narrow, 1080-60 Medium & Narrow as well, they are super cool.

Whisbar WB400 Wins International Product Design Award

Whispbar_logo

Whispbar’s new WB400 J-Cradle Kayak Carrier has been chosen from among over 3000 entries to receive a 2013 iF product design award. Established in 1953, the iF (International Forum) is among the most prestigious international product design awards. In choosing this year’s product design winners, the renowned international jury considered multiple criteria, including design quality, finish, choice of materials, degree of innovation, environmental impact, functionality, ergonomics, visualization of intended use, safety, branding and aspects of universal design. The Whispbar WB400 was entered in the Transportation Design category.

WB400_3

“We are thrilled to receive this prestigious recognition from iF,” said Garrett Barnum, Global Product Manager for Whispbar. “Design innovation and aesthetics are integral to the Whispbar product line. Whispbar offers streamlined styling that doesn’t compromise the look of high performance vehicles, along with excellent performance. We are excited to introduce our newest Whispbar accessory, the WB400 J-Cradle Kayak Carrier, this spring.” Added the Whispbar WB400 product designer, Jason Sagen, “The sleek Whispbar WB400 beautifully combines form and function to complement and even add to the vehicle’s aesthetic. So, even though the Whispbar WB400’s QuickDock technology makes it very easy to remove, drivers won’t feel compelled to do so.”

The Whispbar WB400 is the sleekest kayak carrier on the market. A complete cradle system, it features slide-out loading arms for effortless loading from the side. Through this innovative design, the WB400 saves valuable crossbar space so that two kayaks can easily fit on the car. Utilizing Whispbar’s innovative QuickDock technology, it takes just moments to install or remove the mount from T-slot bars. The Whispbar WB400 will be available in March 2013 for $249.

The WB400 is part of Whispbar’s new full line of accessories for its award-winning Whispbar rack system. The new Whispbar ski, bike and boat mounts seamlessly integrate with the rack system, which has been recognized for enhancing overall vehicle appearance and performance through its unparalleled sleek and aerodynamic design.

About Whispbar 
Whispbar is the quietest, most efficient integrated roof rack system in the world. Created by a Rolls Royce aeronautical engineer, its sleek, aerodynamic design is the result of decades of design and engineering. Yakima acquired Whispbar in 2010 and launched it to the US market in 2011. http://www.whispbar.com

About Yakima 
Yakima Products, Inc. is a world leader in the design and manufacturing of cargo management equipment solutions for a variety of consumers, from outdoor enthusiasts to car aficionados. The portfolios of brands include: Yakima, Whispbar and Prorack. Each of the individual brands offer a variety of cargo management products including racks for bikes, boats, ski equipment and other gear, cargo boxes and bags and high performance multi-sport trailers. The Yakima Products, Inc. global headquarters is in Beaverton, Oregon.

For more information, visit www.yakima.com.

CamelBak Charge 10 LR Review

cb_charge_10_lr_main
This is one of my favorite hydration packs of all time, and it sticks to your back like Velcro, and carries the weight low on your lumbar. It’s a tough well made pack, with lots of features and innovative designs. It’s a small pack with only a 2 liter water capacity, but it functions extremely well for almost any ride of moderate distance.

The CamelBak Charge 10 LR hydration pack is extremely comfortable, light and conformable, and features their lumbar Antidote reservoir, which is located at the bottom of the pack. The design places the water low on the hips and back for stability and comfort, and the pack becomes part of your back, at least figuratively, as it conforms to the shape and oddities of your body. The Charge 10 LR uses lightweight ripstop fabric, has great organizational pockets, a softly padded back panel and hip belt, and uses their 70 oz (2 L) Antidote Reservoir.
cb_charge_10_lr_colors

CamelBak Charge 10 LR
The Charge 10 LR (Lumbar) weighs in at a svelte 507 grams, and has padded back, hip, and shoulders, and is constructed with their Ultra-light materials, using a combination of ripstop and stretchy nylon. The wraparound body uses their LV back panel, and Ultra-light 3-D Mesh Independent Suspension with Slider Sternum Strap. The upper portion of the pack has a long and narrow zippered main compartment, which opens in clam shell style for easy access. It has three meshed organizational pockets, one large and two smaller ones, and the larger one has a Velcro closure tab. There is an overflow storage sleeve on the back, which extends down the bottom two-thirds of the pack, and closes off with a cinch strap. The sleeve uses very stretchy fabric, so it can expand to hold various apparel or other items as required. The padded hip belt uses 1-inch webbing with a front clip, and has zippered cargo pockets on each side. In addition, the pack is equipped with lumbar compression straps, which draws the bottom of the pack into the back as the reservoir’s water volume decreases, keeping things stabilized, with the weight in tight to the body. All the pockets and compartments combine together to give 488cu in or 8L of storage space, although the outer sleeve adds quite a bit of additional volume. The 70 oz. or 2L Antidote reservoir with the Quick Link connector, sits in a zippered pouch at the lower back, wrapping backwards around the hips and the lumbar. The pack will come in two colors, Pirate Black/Graphite and Skydiver/Dove (tested), and will retail for $110.

cb_charge_10_lr_reservoir

Antidote LR Reservoir
The Antidote lumbar reservoir (70 oz/2 liters) sits horizontal in contrast to the typical vertical layout, and it includes mini baffles (the small cutouts) to keep the water from sloshing around and keep the shape from getting too fat (flatter bladder), and it makes it bend easier at the wings. The bite valve worked quite nicely, and was easy to draw, and didn’t leak. The screw cap for the fill port takes only a quarter turn to open or close, and it does not get stuck and require brute force to open. Just line up the arrow on the cap with the circle icon ‘O’ (with arrows pointing in tightening direction), and turn it a quarter turn clockwise until it lines up with the solid circle icon by the top hanging hook. It only takes a light touch to close the cap, and its water tight and snug. The fill port has a wider diameter hole for easier filling, cleaning and drying, and has a handle which hooks onto the drop slot of the packs zippered pouch, helping to keep it stable and secure, and makes it handier to hold the cumbersome wide reservoir. They added an auto shutoff quick disconnect, named the Quick Link, which allows you to disconnect the reservoir from the drink hose, which facilitates cleaning, filling and drying.

From MTBR.com

GSI Outdoors- Crossover Kitchen Kit

gsi-kitchen-kit

By Erika D.

My boyfriend is a great cook, but not the best packer. So our car camping and road trips tend to involve lugging along a tote filled with cooking utensils, dish soap, and the salt and pepper shakers grabbed from our kitchen counter as we run out to the car. Now that we’ve discovered the GSI Outdoors Crossover Kitchen Kit, we’re packing very small.

This compact cooking kit is the size of a waist pack, so it’s easy stash in a backpack or bag. It also has small D-rings on each side so it can be attached to the outside of a pack. Inside the main compartment, there’s a spatula, a serving spoon (with measuring lines for tablespoons and ounces), and tongs, as well as a small cutting board. All of the utensils have pivoted handles that can be closed when not in use and extended and locked into place when I need them. My boyfriend doesn’t really care that much about gear, but he was impressed with the generous sizes and sturdiness of the GSI Outdoors Crossover Kitchen Kit’s utensils. The fact that he uses this kit means he finds it useful.

The GSI Outdoors Crossover Kitchen Kit also has a spatula head (with a soft and a hard side) tucked into a sleeve in the main compartment. It’s about the same size as the one I use at home, but packs easily since it doesn’t have a handle. The cutting board is rigid without being too thick. I like that. There are also three small containers in the main compartment of the GSI Outdoors Crossover Kitchen Kit that are held in place against the inside of the bag with wide elastic straps. We use the tiny bottle for dish soap (of course, biodegradable) and the medium-sized bottle for olive oil. The third bottle is really two small bottles that are screwed together that we use for salt and pepper, or, salt and basil. Once I unscrew them and remove their lids, I have the option of using the inner lids to pour or sprinkle my spices. Very nice.

The lid of the bag as a Velcr0-like sealed pouch that holds a scrubby for washing pans and a Sham-Wow-style dish towel. The lid has mesh along the edges so once we use the items and repack them, they get some air to dry.

It’s so nice to have a mini kitchen set wherever we go. Even when I insist on staying in hotels, we bring the portable camp stove and cook our dinners in  hotel parking lots (we’ve even made dinner on a balcony of a fancy hotel!).

I have to say that I have been won over by this handy little kit. I’m a terrible packer, but I actually enjoy using the GSI Outdoors Crossover Kitchen Kit. Now, it’s my job to  fill up the bottles the night before trips and make sure the kit gets packed in my purse or backpack.

fitnesstravelgear.com
www.gsioutdoors.com